September 11, 2026

Let's Thrive over 65!


Do you ever journal? I mean, do you write a note or a thought or a word in a notebook?  I started art journaling this year, and I recommend it to you, to everyone.  The one thing I love the most is that there are only the rules that you make - its doodling, its taking some time to declutter your mind, its a few minutes with your feet up or away from the noise of your life. There's no rhyme or reason why I decided to put these words or scripture with the doodle art.  But there doesn't have to be, and I certainly enjoyed playing with color.  Grab an old planner - I got mine free at a yard sale - and start doodling.   Write a note about why you picked the colors, or what you saw that made you laugh today.  I've just been journaling over the summer (2026) and I've already reread my own words and was surprised - we can't remember every thing we ever thought.   Try It!

Here is the link for the book that my Women's Fellowship Group will be focusing on in SEPT & OCT of '26.   Follow along with your own copy of this book, also available on Kindle.  This is the book "Aging with Grace" 

Follow this page for weekly notes and reflections I'll share, using study questions from this book, my own life experiences, and scriptures from the Bible.

Many women I have talked with over the last year have the same concerns: how do we live our best lives while our bodies are aging and our society does not honor us as senior women? How do we put one foot in front of the other and live with the same joy that we have celebrated through our earlier years?

Our Fellowship & Study begins September 17.   Come back and join us here on this blog!

Be Blessed! sb

September 8, 2026

FROM SERENITEA TO SERENITY


Hello there!  Thanks for stopping by! 

THE BEGINNINGS OF THIS BLOG AND WHAT IT EVOLVED TO BE

I started this blog "Serenitea-sb" in 2012 to share the tea parties I held, the menus, table settings, linens, decorations - all ways we found serenity.  I've discovered as I look back, that several of these guests have passed away, so having the memory of time spent together with their photo has been comforting to their family as well as to me, a tea party friend.  As time passed, I began to share my journey with weight loss and getting physically fit - something I'd never done in this way.  And from that I have written many personal thoughts about my faith, and the growth I experienced through all of the above.  

FROM SERENITEA TO SERENITY

So now in 2026, I have decided to share my writing again and invite you to be a part of it.  Though my blog is still called "Serenitea" you will find it is not just about tea!  I hope you will follow along as I share my thoughts, writings, and women's fellowship notes on the studies my friends and I are doing. Plus, if doing a bit of artsy projects brings you serenity, I hope you will pull up a chair because there's space around my table for you.  Let's enjoy some fellowship & creativity together!

BLOG POSTS FROM THE PAST

Take a tour through the posts from the past: tea parties, devotions, weight loss journey which includes my thoughts and concerns about making big changes in my lifestyle.  

BLOG POSTS BEGIN AGAIN

Beginning mid-September of 2026, I plan to be posting notes from my Women's Fellowship Group as well as regular thoughts and ideas that will inspire you all!

We'll be diving into the "Aging with Grace" book based on Psalm 92:12, 14.  You can purchase it if you wish through the Revive our Hearts ministry website or from Amazon. 

Revive our Hearts Womens Ministry

Aging With Grace

For my creative side, follow me on Instagram and YouTube where I share my paper crafting and junk journaling ideas, and inspiration from everyday life with nature that brings me serenity. 

Click on the blue lettered words above and below, which will be an active link to those sites.

Instagram

YouTube


Whatever you do today, find a little time for Serenity!  Be Blessed! sb


HOPING AND PRAYING, WISHING AND WANTING

This post was written in 2014, posted on 9/7/14.  I'm sharing this again on September 8, 2026! for two reasons: to remind myself of accomplishments I've made, that at the time seemed insurmountable (is that a word?) and to be an encouragement to you!  SB

---------------------------------------------------------------------------

Have you been hoping and praying that something would happen or change for you?  "I wish this were so."  "I hope that will happen."  "I am praying about that."

For years, I had hoped that 'someday' I would be able to participate in life a bit more actively.  When I became a grandmother (12 times since), I had a rude awakening that just hoping to be in better shape and more physically active, wasn't going to happen by itself.  I knew that in order to keep up with my little grands, I had to make a serious effort to being physically fit.

I do pray, believing that my request will be answered according to God's will and plan for my life.  Hoping to have will power.  Wishing to be more active.  It seemed that no matter how much I hoped or wished, the will power or incentive to accomplish this was not there.  What complicated the will power or incentive was chronic pain.

I've been writing about my journey to being healthy and physically fit at Motions Fitness. I've come to realize that all the hoping and wishing wasn't going to amount to anything without praying and wanting to change.

Since my last post, I have attended "Body Pump", a weight-lifting class. I must admit that I have always wanted proper instruction on how to lift weights and once had hoped to someday have a chance to do this.  But it had been a long, long time since I thought about really lifting weights.  The chronic pain had gotten in the way.  I'd watched the movements and sets from the back of the room, but now that I was in the class, it was really hard to keep up the pace and keep trying without giving up.  Tearfully, at one point, I wondered how I would ever make it to the end of the class in one piece. But then my trainer got right beside me, and helped me with each move, until I got back on track.


That "coming alongside" me that my trainer, Lisa, has done from the very first time we met at Motions Fitness, is the visible part of our trainer/client relationship.  To me, Lisa's actions were above and beyond the "you can do it, you can do it," support I have received at every stage of my work out plan. But to Lisa, this is her commitment to help her client succeed and realize all that is possible.


Before the class ended, the instructor reminded us that every set we do in every class must be a challenge to us or what good would it be? It was as if he was telling me personally that the hoping and praying, and wishing must turn to wanting to be healthy so bad that you keep challenging yourself, again and again and again.

So the tears keep coming, the tears of leaving behind the "I can't" and "am I going to make it" ....  as I move from wishing to wanting.  Nothing I have tried previously ever got me to the stage of wanting such a challenge like this, until now......at Motions Fitness.

I am praying for strength to keep meeting the challenge.

Until next time, keep striving.

August 18, 2021

Tone on Tone Cards - No Ink or One Color

Card Idea #1: Tone on Tone with Paper - No Ink


Are you new to card making?  Here's some basic measurements and folds to create the card base. Start with Basic White cardstock for the card. With one 8 1/2" x 11" piece, cut it in half at the 5 1/2 " measurement.  You will have two pieces.  For this card, we'll use one for the card base and one to cut in two for layers.

Scoring is done by making an indentation in the paper with a "scoring blade" as shown here on the paper trimmer, or with a scoring tool. Both tools put an even line, an indentation, to be used for a fold. 


Now that you've scored your card, and folded it in half, you have the standard card size used in the United States and is referred to an an A2.  Here it is shown with the fold on the top and below, it is shown with the fold on the left.  You'll use the measurements of 5 1/2" x 4 1/4" (convert to metric here) over and over.  Its good to know them, as you add layers, since the layers can be cut 1/16th of an inch or 1/8 of an inch smaller, which leaves a small frame around the edge.  Look at the first card on the top of this post. You can see the small Cinnamon Cider color frame around the white.


All white cards - cardstock and embellishments - are beautiful for any occasion or holiday. Beginner card makers can design and assemble cards without purchasing many cardstock colors or inks. This card uses a white layer with the Timeworn Type 3D embossing folder on Basic White Cardstock, cut a fraction smaller than the A2 card size.

The Timeworn Type 3D embossing folder and Detailed Pumpkin Dies are available August 3, 2021, in the July-December 2021 Mini Catalog. (If purchased during August or September 2021, a $50 purchase before tax and shipping will qualify for free stamp sets or Designer Series Paper, Sale A Bration.)


Cut a vine, leaf or flower to build the design on the front.   Here I added a pumpkin.


Or put a bird in the vine,


Or move the vine to the right side and add a dragonfly.


By trimming the embossed white layer by 1/16 or 1/8 inch, you could add a black layer, although it would look beautiful without. You're the artist!


Card Idea #2: Tone on Tone with ink.

Using the same cardstock and ink colors, here Highland Heather Cardstock as the layer, and Highland Heather Ink, I stamped with the August/September 2021 Sale A Bration stamp set "Delicate Dahlias."


To add dimension to this card I stamped the Dahlia on vellum. Taking the stylus end on the Take a Pick Tool, I traced each petal on the reverse side.  The stamped image is visible through the vellum. This technique works best when outlining on the vellum that is placed on a soft or cushioned mat. 


The vellum Dahlia could be added as another layer of the flower to the design.

As another option for tone on tone with ink, you could stamp with Versa Mark ink.  This is a watermark, clear ink, and will dry clear, so it will look the same color as the cardstock.


As noted on the photo, I used Stampin' Blends Alcohol Makers for the centers of the flowers including the vellum Dahlia, and Wink of Stella glitter brush, to highlight the centers.


 As shown below, I also used clear embossing powder and heat embossed the leaves. With the 2021-2023 Stampin' Write (water based) markers, light green, and the Stampin' Blends, Old Olive, I shaded the leaves.  Using the clear embossing powder adds dimension to the leave. See its shine.


Add the vellum Dahlia to the card with adhesive glue only in the center so the edges pop up. You can also curl the edges up or down with your bone folder.


After using both the ink on the same color cardstock, and the Versamark on colored cardstock, I think I prefer the look of the Versamark.

Make sure to click on the green highlighted words - they are the direct links to the Stampin' Products! I used for these cards.
Post your questions or photos of your versions of the cards in the comments or send me a message. 

Thanks for stopping by!  Be Blessed!  sb


May 20, 2021

Beginner Card Making Class #2 INK


Continuing with the technique of "Paper Ink Stamp", our second class was focused on Ink.  While its somewhat of a challenge to go back to the basics after having stamped for 30 years, I do love showing others that its not difficult to make beautiful prints such as this.  Learning how to blend colors, with ink and the tools to do so is our focus today. Make sure to click on the color highlighted words to learn about the products and techniques!

To see the possibilities of using inks in addition to stamping, we tried three ways: 

1.  Use a drop of ink with a few spritzes of water, and add to your stamp as though it was paint. Then stamp your image which will look similar to a water colored image.  The Silicone Craft Sheet works well for a temporary "palette".

2.  Use a water base marker, such as the Stampin' Write markers, to cover the stamp, and spritz with water, then stamp the image. This also resembles a water colored image. Alcohol makers do not work with water spritzing.

3.  Take the ink/water mixture that remains on your "palette", the Silicone craft sheet, piece of plastic,  or plate you've used to mix the ink and water, and put your paper upside down on it to capture every drip of ink left. This makes for an interesting background piece that can be used for a sentiment tag, punched flower or background.

For the INK class print, black embossing powder was used first. Then using the Blending Brushes, and refill inks combined with water, blend the inks to complete a colorful background. Wipe the ink off of the embossed image.  Add ribbon or a sentiment tag.  Layer in black with 1/8 inch border, and attach with firm drying glue to card base. 


To make this print we started with white cardstock. The stamp set is called "Etched in Nature" and though currently unavailable, Stampin' Up! is working on upgrading it to meet their excellent standards. Message me if you have questions about that.

Use a watermark ink, in this case, Versamark, which is a clear sticky ink, to heat emboss with black embossing powder.  (If you're new to heat embossing, watch a short video as Karen Titus demonstrates the technique.) The embossed images are the "watermark" of this print as you add the color over the top and it doesn't change the embossed image.

To heat emboss:

1.  Choose your background paper color, can be white or color or black.

2.  Choose your embossing powder color to contrast or coordinate with your background. Karen Titus shows these varieties in her video as described above. 

Wipe across your card base with an "Embossing Buddy" which removes the static (that you can't see) before you stamp with Versamark to heat emboss.  Once you forget to do this first, you will see how the embossing powder gets all over the card and not just stick to the areas of versamark ink. An embossing buddy is a small bag with corn starch or similar powder inside.  You can purchase one at a variety of places or make your own. This video shows embossing and the use of the embossing buddy.  The embossing buddy in this photo is off to the right.

This technique is called "resist" and can also be done with white or clear embossing powder on white paper.  

Once you've embossed your image on the card base, then choose colors of inks you'll want to blend for the background. I like to identify a "light source" as though the sun was shining from one direction, but that's not necessary to make this print.  

The colors for this print are: Daffodil Delight, Blushing Bride, Mint Macaron, and Evening Evergreen (In Colors 2021).  The tools are the Blending Brushes, and Stampin' Write marker in the 2021 In Color, Pale Papaya.  I used the refill inks by combining one drop of the concentrated ink and spritzing it with water to get a desired shade.   

To use the inks like this, you'll need a piece of plastic or a non-porous surface, like the Silicone Craft Sheet, or a styrofoam plate, to mix the ink with water, and one that gives surface space for you to put a little of the ink on the brush and blend it around the paper.  I work on a plastic place mat with a large paper place mat underneath my print, to practice a swirling motion with the blending brush.

Here, I've embossed with clear embossing powder on a white background - think about what colors will surround your embossed image.  This photo shows how to hold the Blending Brush and to use a circular motion to apply the color.  You'll want to practice on scrap paper first to prevent a big blob of ink all in one place. Like any new tool or technique, it just takes a few times before you discover what works best for you.  


After blending one color across the card base, take a lint free cloth (not Kleenex) and rub away the ink that will remain on top of the embossed image.  The ink on the paper will dry shortly.  Keep that in mind if you want to add blue right next to yellow but don't want to end up with green. Give the ink time to dry if you don't want a blended color. However, if you want purple from pink and blue, blend it immediately.  Experiment on a separate piece of paper - the ideas become endless.

I did try to add ink from a Stampin' Write marker and rub it off but it absorbs instantly into the paper and leaves a deeper shade. (the bottom edge of the card - top photo)

Here is a print made with no embossed image but with using the blending brushes and ink on textured water color paper.

Here are a couple of prints from the INK class.  Not one is the same and that's the beauty of art!  Remember this: you are the artist.  Your print is your perception of the idea - there are no mistakes! 


Go and experiment with blending your colors and feel free to post your print in the comments below.  If you're interested in Stampin' Up! products, I'd love to share this fun with you.  Just check out the highlighted links above and more posts on this blog.


Thanks for stopping by! sb


May 7, 2021

Designer Series Paper - Simple cards

Here's an introduction to basic cardmaking and sizes. 

There are many patterns. The A2 base card measures one half of a standard 8 1/2 x 11 inch piece of cardstock.  So one piece yields two card bases, whether you cut it portrait or landscape.  In the United States, this is called an A2 card, so that when folded in half, the card is 5 1/2 x 4 1/4 inches.  Learning this size is helpful for planning your design and for cutting layers of coordinating patterned paper which can be 1/8 or 1/4 of an inch smaller, in increments, as you desire.  

Learning that these are the sizes to give a framed accent will enable your colors and patterns to pop when combined into your design.  Most card bases are of solid color, but I have seen the card base out of patterned cardstock, and the layers of solid color.

With Stampin' Up products, the patterned paper is called DSP - Designer Series Paper.  Each May a new large catalog of coordinated products begins, with smaller specialty catalogs happening in August and January.   Check out this link for info on the catalogs.

One piece of Designer Series Paper (DSP) is 12x12 inches square, although there are some patterns that are only sold in 6x6 pieces. There are a variety of cutting patterns to get the most pieces for your card layers out of one 12x12 piece. You may have seen the "one sheet wonders" idea, where several different sized pieces are cut from one to form many components of card styles.  You can check out Karen Titus tutorial here for the one sheet wonder.

But the two ways to cut the DSP that I use most often for quick assembly cards are to cut one 12x12 in four 6x6 inch pieces or  in six 4x6 pieces. 

Here is one idea on cutting the 6x6 pieces of DSP to make cards.  This card base is called a "mini- slimline" meaning that the card base itself is a 6x6 inches square, and scored in half at 3 inches. I also like this triangular pattern because once they are cut, the triangles can be used on an A2 card with just a little additional spaces between them.


Even though this is cut for the Mini Slimline, which fits in a regular envelope, the size you would send a letter in; if you push the triangles apart a bit, you can arrange them to fit an A2 card which measures  5 1/2 x 4 1/4.  Either put a flower in the middle, cut out from this paper, or a tag for a sentiment.
  

This piece of 6x6 DSP is used by cutting it at 4 inches, leaving a 2 inch piece.  Cut 1 inch off the length, which leaves the remaining piece 5 x 4 inches.  Use the 2 inch piece on the right for another card, or glue it to the outside flap of the envelope to decorate it to match the card.


Use the one inch piece that you've cut off of the length inside at the bottom of the right side to accent the inside.


Because this is DSP, Designer Series Paper, it is color coordinated. So this card layer is made simply by tearing or cutting the rectangle in half and flipping one piece over.  Put a piece of ribbon or another color coordinated piece of DSP as a border, or leave it as is.  Add a sprig of greenery or a flower, or any die cut you wish such as a bird or a balloon to declare the intent of the card. Add a tag with the sentiment or put the sentiment inside.

Cards such as these are easy to put together when the color coordination is taken care of by the designers in advance. 

Choosing the DSP Designer Series Paper from Stampin' Up is a good product to get to start to make cards if you don't have a great deal of supplies.  

Get yourself some DSP to design your A2 or Mini Slimline cards - I know you'll love the double sided designs that are color coordinated with all the other papers, inks, embellishments, markers and more.

Find someone to be a friend to today - send them a hug with a fold in the middle - a card, as our CEO Sara says.  If you don't have a demonstrator I'd love to help you discover the joy of making and sending cards.  And I'd love to see what you make.  Leave me a note or picture in the comments below.  

Thanks for stopping by!  Be Blessed!  sb


April 28, 2021

Card Making - a little at a time

When you begin a new hobby, or are upgrading your supplies and tools like I did in the summer of 2020, take some time to decide your intention for getting more supplies and tools.   If you're a new hobbyist, beginner card maker, or casual paper crafter and just came to this post to discover what basic supplies you need to be a card maker, skip on down to the red words and read the supply list.  But I'm telling you, you should read the whole thing, because you might need this wisdom some day.  😀

Am I going to make cards and paper crafting projects regularly? How will I use the projects I make?

How old are the products I already have?  Will I find that using the old products and tools are more of a hindrance than a help?

Will I have the space to store them properly for care, and for use?

Am I prepared to replace the consumables (Paper, embellishments, glue, ink refills) regularly?

What is my long term goal for accumulating stamp sets, dies, and tools?

Beginning in the spring of 2020 when all of  our lives changed - we were staying home more than some of us wanted (Me!) and eventually working on projects we'd put off for that "rainy day" when we might have more time or interest (that meant now!). One of those tasks for me was out a lifetime of craft supplies and organizing my craft room. Now it wasn't just cleaning - you know, like vacuuming the corners and walls, but opening every cupboard door and drawer and box lid. Yikes!  You mean I really have had that for ten years and never opened it once?!  

I started a "I don't use this" box and another, "I guess I've realized I'm not interested in doing this anymore" box which was really hard.  It didn't fill up as quickly as I had hoped.  $300 later - the result of selling my useable craft supplies, not only gave me more space, but a new outlook as to what I really wanted to spend my time doing - making cards.  Also 2020 had opened up my mind (and probably yours, too) to the necessity of sending cards to so many people in need, as I say, to "cheer up the world, one card at a time." 

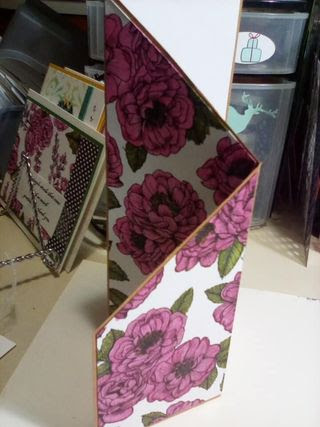
I began to watch Stampin' Up Demonstrators and others of every paper crafting product and company teaching how to make the most amazingly beautiful cards. I was still under the belief that YouTube was for wacky things and old, old television shows. Boy! was I wrong! There's probably still wacky things and old television shows, but now I was learning the latest card making techniques, and the tools and products needed to do them. I was hooked on the fun folds. Here's some samples of ones I've made:


Cube Card


and the Z folds and the pocket cards, and ......and......good thing I had already asked myself the questions, so I'd know what direction I needed to go. 

If you are at the point where you should clean out your supplies - just get started with the questions because the boxes will come next and you'll be able to fill them up. It really is freeing - yes, you can do it - tell yourself that someone else will be delighted to get a box of products for their new hobby. Why do all that, soul searching questions and boxes, you say? so I wouldn't end up with every paper crafting product from every company under the sun and in 10 years have to go through this mess again!  

 Even if you've never been a craft collector like me, and are just getting started, this post is for you too!  Here's the list of what I would recommend for a beginner card maker (or what basic supplies to keep from your lifelong list of craft collectibles). Click on each link to see the product and read the description below it.

Basic White Cardstock  $9.75/40 (U.S. prices) (you can get 80 cards out of 1 pkg)

Basic Stamp Set Or a stamp set that will give a variety of uses and icons $5.50 - 23.00

Black Ink pad $6.00

Ink Spots and Ink Refills $9.00/5 of the mini "spot" pads for you to add your choice of color; $3.75 for the refills  and two or more colors

Of course you would need envelopes for the A2 (5 1/2 x 4 1/4 inch) card.  Or make the mini slimline that uses a regular letter envelope or the slimline that uses a No. 10 business envelope.  You can make your own envelopes out of a variety of paper as long as its not too thin.  I often use old calendar pages, but make sure to use a white label so the postman can read the address clearly.  You'll find envelopes here. $7.50/40

You will need a good pair of scissors, a cutter with measurements  and adhesive and glue. This glue gives you a few seconds to reposition your item before it adheres completely.  It is very strong and also  recommended for its fine tip on one end and wide tip on the other.

 If you didn't want to invest in the ink colors, or a detailed stamp set in the beginning, you could start with the black ink pad for a sentiment, and DSP - designer series paper which is double sided, and could yield as many as 72 cards out of one 12x12 pkg. ($11.50 - $15.00)

There are two other ways to make cards without investing in too much in the beginning: kits.  The kits come with precut designs that are double sided, and of course, coordinating colors; pre-printed sentiments and tags, envelopes and all the pieces you need to make cards and for a reasonable price.

                                                                         $10/50 cards  


                                    You might also like the monthly subscription kit, Paper Pumpkin, 


This kit includes everything needed to make 6-8 themed cards.  This is also a fun activity for kids.  Get one month. Two months, six or more. Save money the more months you subscribe to.  This is also a good way to increase your variety of inks, and stamps which are not included in any other catalog.  

There's alot to think about here, but I can assure you, after making cards for 30+ years, that there is great enjoyment in making cards to include in a gift, to give to a friend, and to have on hand for the many events that surprise us which we need a card for.   

Card making - a little at a time - is how this can be done.  Some crafters fall in love and want it all, all at once. Some crafters enter the hobbyist stage acquiring a few supplies and intend to add to their collection. 

Whatever your interests or goals, I hope you find this helpful.  Come and join the community of card making. Watch videos, look at scads of designs and ideas from card makers around the world, then use your imagination to create a cheerful greeting; and help to "cheer up the world - one card at a time" as I say.   

I hope you find these suggestions helpful. (thanks for reading to the end!😮)  I'd love to know if you are a card maker. Will you share your project below?  Thanks for stopping by!  Be Blessed!  sb


March 3, 2021

Serenity and Hands


Click on this link for Today's Serenity for just a moment or longer.  

Karl E. Lutze, author of "Forgive our Forgettings, Lord!" has written this action prayer. Though it was written in 1972, I've added a few phrases to bring this timeless prayer up to date. You can read and participate as one or with a group.

I read this while listening to the Tim Janis music from the link above.  

Your Hands Stretched Out to Us

ALL:

Your hands, once tiny, holding a parent's little finger, or fumbling with a toy;

These hands that grip steering wheels, flick light switches, turn door knobs, press letters and links on keyboards and screens, push vacuums, lift dish towels and fold laundry;

These hands that guide pencils, hold children, wield heavy tools, count, sort, gesture, wave or manipulate fine instruments and intricate machines;

These hands I fold - a symbol of constraint of my own activities so that I might concentrate on what I am saying when I pray, "Into Your hands I commend myself."

ONE:

Those hands that rested on the shoulders of burdened people, that passed out food to throngs, that lifted little children high, that touched the eyes of blind men and made them see again;

Those hands that touched fevered brows with cooling relief and healing; that drew saddened people near; that touched corpses, restoring life.

Those hands, when raised, stilled storms.

Those hands broke bread and passed the cup.

Those hands you surrendered to, hammer and nails and death.

Those hands revealing scars were raised to communicate to men God's peace, forgiveness and love.

Those hands stretched out to us, beckon and invite, and so we come to hands far stronger than our own, at Your hands to receive strength for our own weary, failing hands - strength to draw away from greedy grasping and selfish seizing

ALL:

Take these folded hands and open them to receive Your love and to share that love with others whose hands have long been cold and empty and far too often crushed and crippled by selfish and thoughtless people.  


You have made us members of Your body, forgiving our stiff and unbending paralysis.

Strengthen us to be the hands that reach out in Your name to the lonely, the frustrated, the frightened, the exhausted, the bitter, and the hopeless, with Your love, so that hands everywhere may be raised in praise to You, whose hand is ever upon us to hold us fast and to give us peace. AMEN (K.E.L.)

Be Blessed! sb