key words, "on our way," as we are not quite there yet
 I learned that I could cast on the stitches closer to the point of the needle, as long as there was a long length of thread as this loop, and more extending through the eye.
 Here's what I was omitting. I needed to put my finger in the loop before I pull the needle through the stitches.

TAKING THE DESIRE TO TAT ONE STEP FURTHER
Even though there are many tutorials and videos available (and my free class) for shuttle tatting, I couldn't successfully "jump the knot" more than 6 times. While shopping at Hobby Lobby in February, I purchased a tatting needle kit with instructions. Since attempting to tat with this method, it seemed so much easier. I made lots of little circles with the picots (pronounced PEE' co(s)), but couldn't get them off the needle. Back to the class I went, and now I can at least make a circle with a few picots, then another circle.


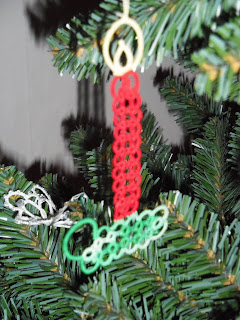
Here are my two circles with picots - I am so proud. Yes, it's baby steps, just baby steps. Do you think I'm ready to learn to read and follow a pattern? I've still got my goal of making some 3 inch wreaths for next Christmas. As always, stay tuned.......
TAKING THE DESIRE TO TAT ONE STEP FURTHER
We attended an informal class on Saturday, January 19, 2013. One of Mrs. Medlyn's students was our teacher, and a very patient one, I might add. Learning with a thicker thread, and two different colors was helpful especially when we learned to "jump the knot." After several tries, really lots and lots of tries, I realized the words "jumping the knot" did not make sense to me. Once I discovered that it meant that your ball thread had to end up being the dominant knot color, it finally worked. There were ten of us gathered around the tables, and I bet that every one of us - two lefties included - had a varied concept of the knot. Many a time I was ready to admit this was not for me, but by the time we ended our first session, I could actually have a conversation about my knots, which were right, and how they had to slide on the thread. We are on our way to learning this very neat handiwork....key words, "on our way," as we are not quite there yet. Thank you, Vicki!

Everyone in the beginner's class did some other kind of handiwork - quilting, embroidery, sewing, knitting, crocheting, Hardanger or needlepoint, though that is not a requirement.

To begin, we used two different colors, and attached them to a paper clip so we had something to hold on to.

Then there came learning how to hold the ball yarn, using certain fingers for the tension. I found it similar to using certain fingers for tension when crocheting. But it still seemed so foreign, and my fingers don't bend as well as they did once.

A very twisted chain of correct and incorrect attempts at the knot, with the last few red ones being right; followed by learning the picot (pee' co) and being able to slide the stitches back and forth.
Yay! I can do that. The pictures are to help me remember next time.
Yay! I can do that. The pictures are to help me remember next time.
What a special afternoon it was! I had the opportunity to view a Christmas tree, finely decorated with tatted ornaments. My friend Suzie and I went to Mrs. Medlyn's house on Saturday afternoon, January 5, 2013. We went to see her tree, but there was far more than that to take in. Both of us had taken some tatting lessons awhile ago, but neither of us tat. It's not that we don't have an interest in this fine needle work that has been around since the age of the Egyptians,because both of us sew, scrapbook, and make a variety of paper crafts. It's that we just couldn't "jump the knot" and thus never got back to it until recently when we saw some motifs made for Christmas cards.
What we experienced can only be shared through the photos we took and a few explanations. The two of us, Suzie and I, are great conversationalists (we like to gab) but the creativity on display in this home left us next to speechless - really!

BELL ORNAMENTS
This display was bells, all of which were hand made, many with a special story. Some were made by fellow weavers in their group. Some were given by others in their hand bell choir. One was made by her mother. One in particular was made out of a stain glass window in the shape of a bell.

SWEDISH ORNAMENTS
Another small display of hand made ornaments, some made by Mrs. Medlyn and some by others. She is also a basket weaver, so many of her decorations represented that craft she is well known for. The ornaments on this display mostly reflected the Swedish heritage at Bethany Lutheran Church where she is an active member. We were already oooo-ing and awwww-ing.
Then............. we saw the tree. (Imagine the man's voice from "Christmas Story" reading this!) It is a pre-lit 6 foot evergreen, delicately decorated with a wide variety of colors, sizes and unique motifs, all tatted. We were in awe! This was what we had heard about - this is what we had come to see, and now, there it stood in front of us. I felt like a child, seeing the gifts beneath the tree on Christmas morning!


It was just about then that we realized that there was far more to Mrs. Medlyn's talents than weaving and tatting. In the opposite corner from the tree were some interesting hanging angels and a unique framed bark picture.

If our Christmas ornament tour had ended here, Suzie and I would have walked away knowing we had seen more creativity in one place than we had for some time. Now that Mrs. Medlyn had given us a tour of her living room and dining room, we couldn't have imagined what there was left to see.
For a quick minute, I felt like we were viewing something that had never been done or seen by anyone before. I was very humbled, like ordinary shepherds following a star to a barn; like having been given the right to be the first to view this special, talked-about site.
As we viewed several more displays, we saw three nativity sets, one of porcelain she "got just for (her)self," one that was nesting pieces, and one that was cut of wood into puzzle shapes that fit in a manger which she had designed and painted. We saw a corncob snowman and one made of a gourd. There was a tiered basket, shaped like a Christmas tree which had chocolate candy in every layer (yum!) Then we neared the dining room table where Mrs. Medlyn had laid out her tatting catalogs and pattern books, and samples of shuttles and threads, snowflakes and wreaths and other motifs as well. She showed us a runner she had done in white and layered on top of green fabric. Somehow the colors of the poinsetta plant were more rich in color and texture with the runner as a base.


And then the magical words to my ears, "would you like some tea? I don't have fancy stuff, but....." Would I like some tea? In addition to all the beauty and awesome things we've already viewed? Yes, oh, yes, we would love some tea. With our mugs of tea and a plate of Christmas cookies (Suzie and I can never say no to sweets), we sat around her dining room table, and commenced to learn about tatting and view even more delicacies she had made (and I'm not talking tea time snacks here!). Mrs. Medlyn must have had experience from others coming for the same reason, for she was as calm and gracious as could be when we asked question after question after question about the how to's etc of tatting.
  |
 |
For this garland, she showed us that to add beads you had to figure out the pattern first and string them onto the thread prior to tatting the picots. She also noted that using heirloom beads was a way to preserve family treasures while using them without harming them.
|
 |
I felt particularly comfortable sitting where I was. As I looked out her dining room window, I could see the tower of our historic building which once housed Braastad's store and the Gossard factory Facebook/IshpemingAreaHistoricalSociety. To the left is our historic high school, and until recently, the empty lot from our hospital which now has a new home. Mrs. Medlyn noted that although these were great views, the new snowbank wasn't something she preferred to look at.
Learning to "jump the knot" seemed an insurrmountable task in the past, but with all this inspiration I was ready to try again (or, "give it a go" like our English friends say). After a few step by step instructions in her calm, friendly voice, I accomplished "jumping the knot." I realized at one point that this knot was the same as a macrame' knot, and suddenly a new serge of inspiration and energy caused me to get back into the eagerness I once felt to learn this craft.

So....my goal is to accomplish tatting skills enough to make a star or wreath for Christmas 2013. I've learned (it's taken some time) not to have such outlandish goals as making 20 stars and wreaths, although for a split second my newly inspired mind wanted to think that. I have since watched a few videos on Pinterest www.tattedtreasures.com, and soon imagined just a few more homemade ornaments on my own tree.

Set a goal, see it through - learn to tat a star or wreath before December 2013. Stay tuned to see this goal come to fruition.......
Many, many thanks to Mrs. Medlyn for inviting us to her home and sharing her talents and gifts, tea and cookies, knowledge and experience. The afternoon left us speechless, and that's hard to do!
P.S. As we said our goodbyes and left the front steps, she called our attention to her lighted tree in the yard. It was designed and made by her - why were we surprised? Praise the Lord for a woman who uses who God-given talents.

Hi There, I just join your blog. I love seeing how others display their tea items. I love the blue tea pot and cups above. Thanks for sharing.
ReplyDeleteHugs,
Janet